

Last time we shared the list of work items included in the Scope of Work for the application for Certificate of Authority (CA). After leaving from our initial meetings with the City’s Historic Preservation (HP) staff and Code Enforcement inspector, we had a plan. Since the deadline to submit for that month’s HP Commission meeting was very close at hand, we submitted a partially completed application. Thank you for the nice trick HP staff! We were ready to get the ball rolling.
The City of Oklahoma City’s HP staff were wonderful guides to the CA process, and I cannot say enough good things about the care they provided to aid our efforts. They allowed us to send in a first draft application and told us they would follow up in about a week with a full list of any outstanding items. I know this was a lot of work for them. This offer allowed us a little time to document the most pressing emergency work items for approval, before the next deadline.


Save a Building from the Top Down
For every CA application submitted, the HP Staff first assists in the administrative review of any items that they can quickly approve. Fortunately, this included all of our emergency work items, as well as some other maintenance that did not affect the historic character of the home.
With the application in my hands, I worked with the HP staff to establish a system for documenting the work items one-by-one. At this point, we also confirmed that the application would not be 100% ready for that month’s HP Commission meeting, so we focused only completing the emergency work items for the deadline.
Our most pressing need was to patch the roof to on the house and carriage house to protect the structures from further rain damage. We also needed to stabilize damage to the carriage house’s balcony and weatherize the bottom half of the carriage house’s back wall, which was simply gone. Vines had overtaken it.


Pictures, Pictures, Tape Measure
Although, design review for Oklahoma City’s historic districts is concerned primarily with the street facade or "public face" of buildings as opposed to back or side elevations, the work to the sides or back of the property is also scrutinized.
According to the Statement of Intent in the Application for Certification of Appropriateness, "The purpose of documentation is to illustrate what the property looks like NOW, what work is proposed, and what the property would look like AFTER proposed work is completed."
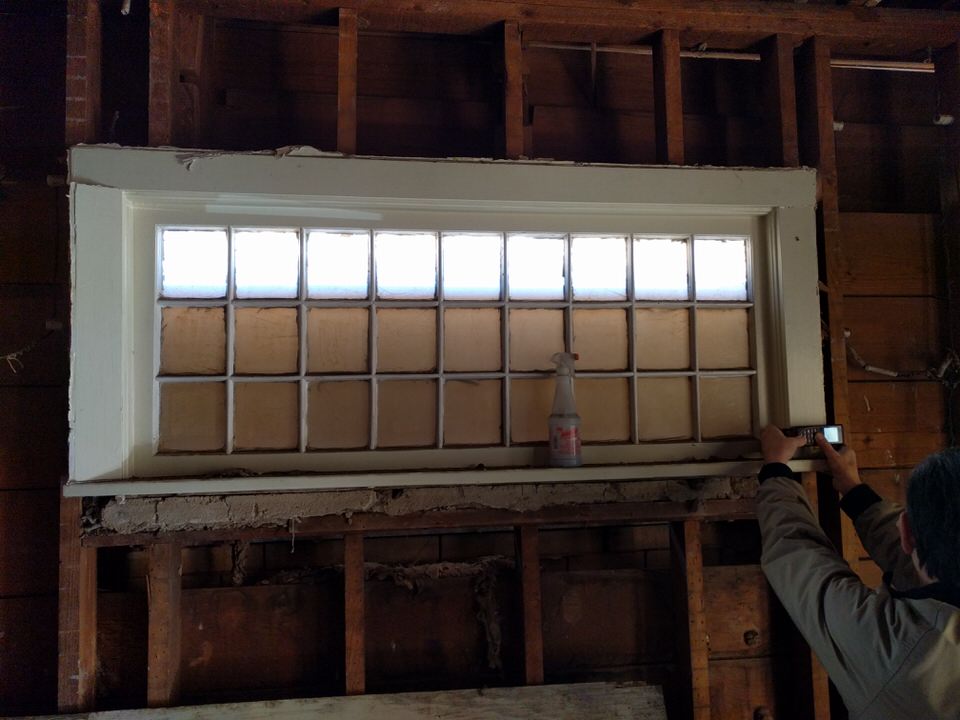
Measuring and documenting the existing conditions is the first priority in historic preservation work. Trust me, you will need good photos of EVERYTHING! In remodels, I face a constant struggle to capture enough pictures in one trip.
When you are documenting an existing material for replacement, a tape measure in the photo can also make review much easier. We were able to wrap up a case very concisely by including both existing and replacement materials with a tape measure in the same photo.


Measure Right
Beyond measuring individual materials and construction details, as set of accurate existing conditions drawings is critical. On any project involving existing construction, David Hudson at Measure Right is my first call.
There are not very many like David or his business. Using a Bluetooth laser and a powerful tablet, he has mastered the process of documenting the existing conditions quickly and accurately. No architectural firm that I know of can match his price, speed or accuracy for creating existing or "as-built" drawings. Plus, all his profit goes to charity! I have found working with him is a win-win for everyone.
Once the contractor had removed the interior plaster from the walls and ceiling, I set up an appointment for David to visit and document the existing conditions. Without the lathe and plaster or the center wall between the former duplex units, the old home began to show us the complete picture of her past.
During David's visit, we discovered that several windows had been bricked over on the west side of the home, and the second front door had once been a window. All these rough opening locations were captured with his measurements. Later that day, I received his AutoCAD drawings.
Design Drawings Submitted with Application
With an accurate existing conditions drawings loaded into my CAD program, I began the process of design. Although, we will be returning to look at these during construction, here is a peek at many of the design drawings submitted with our CA application.
Not all home addition projects require a detailed set of drawings like these. But, the proposed split-level addition involves using the attic space volume for a new Master Suite. This left us very little room for errors, and I wanted to make sure that it worked on paper.


Presenting to the Historic Preservation Commission
Since our plans included reopening or modifying some of the existing, historic windows and doors, as well as a large split-level addition, we knew that we would have to pass the HP Commission for final approval. By working intently with the City HP staff, we had already secured Certificate of Appropriateness on 10 out of 17 of the original list we submitted with the application. But, we still had to tackle the following big items:
- Construct rear addition;
- Replace front porch railing back to presumed historic condition;
- Repair/replace wood windows (Refer Window Survey and Drawings);
- Replace non-historic metal windows (Refer Window Survey and Drawings);
- Remove secondary front door (Refer Window Survey and Drawings);
- Replace second front door with window(s) (Refer Window Survey and Drawings);
- Create new window opening (Refer Window Survey and Drawings).
In addition to a detailed account of each remaining work item and the design drawings, we also created a photographic "Window Survey" to showcase the existing conditions of each window inside and out. Windows are an important stronghold for historic preservationists. Frequently, they have the most character of any single element in a historic home.
We had proposed to use new 1-over-1, insulated (2-pane) wood windows for the new addition, and to replace some missing windows on one side of the historic home. In the end, we were "approved with conditions" that we use only wood, single pane windows on the historic home. Considering that the design for our split-level addition did not even raise an eyebrow meant we had documented the project well. The property owners and I celebrated the few hard-fought months that had prepared us to do the project the right way!
Follow the Construction Process Ahead
This was the fourth post in our series following the renovation of the worst house on the block in an up and coming historic neighborhood. In future posts, I'll keep you updated as we will follow this project in "real-time" as it moves through construction. Don't worry; you haven't missed anything yet. Besides the work items related to emergency maintenance, the foundation for the split-level addition is just being completed.
Post 1: In the Aftermath of Neglect: A Creative Historic Home Renovation
Post 2: Worst on the Block: Historic District & Dilapidated Structure 101
Post 3: Simple HP Review, Survival & Certificate of Appropriateness
Post 4: How to Document for Historic Preservation Review & Top Down Renovation

Resource:
MeasureRight (David Hudson's company website): http://realtime1.net/about.html
Please Subscribe & Share
I love to field your comments and questions. Do you have any questions about this project or related topics you would like me to cover?
If you are not already a subscriber to this weekly blog, you can do so below. And, why not share this post with your friends via social media? Don't we all want to live in a Green Heart Town?